
An effortless, self-hosted continuous deployment platform.


Getting Started · Motivation & Design · Contributing

Inertia is a simple cross-platform command line application that enables quick and easy setup and management of continuous, automated deployment of a variety of project types on any virtual private server. The project is used, built, and maintained with ❤️ by UBC Launch Pad, UBC's student-run software engineering club.
| Main Features | |
|---|---|
| 🚀 | Simple setup from your computer without ever having to manually SSH into your remote |
| 🍰 | Use any Linux-based remote virtual private server platform you want |
| 📦 | Easily provision VPS instances for your project with supported providers such as Amazon EC2 |
| ⚒ | Deploy any Dockerfile or docker-compose project |
| 🚄 | Webhook integration for GitHub, GitLab, and Bitbucket allow your project to be automatically updated, rebuilt, and deployed as soon as you git push |
| 🛂 | Start up, shut down, and monitor your deployment with ease from the command line |
| 🏷 | Configure deployment to your liking with branch settings, build configuration, and more |
| 🔑 | Secured with tokens and HTTPS across the board |
All you need to get started is a compatible project, the Inertia CLI, and access to a virtual private server.
MacOS users can install the CLI using Homebrew:
$> brew install ubclaunchpad/tap/inertiaWindows users can install the CLI using Scoop:
$> scoop bucket add ubclaunchpad https://github.com/ubclaunchpad/scoop-bucket
$> scoop install inertia
For other platforms, you can download the appropriate binary from the Releases page.
Initializing a project for use with Inertia only takes a few simple steps:
$> inertia initTo use an existing host, you must first add it to your Inertia configuration and initialize it - this will install Inertia on your remote.
$> inertia remote add $VPS_NAME
$> inertia $VPS_NAME init
$> inertia $VPS_NAME status
# Confirms that the daemon is online and accepting requests
See our wiki for more details on VPS platform compatibility.
Inertia offers some tools to easily provision a new VPS instance and set it up for Inertia. For example, to create an EC2 instance and initialize it, just run:
$> inertia provision ec2 $VPS_NAME
$> inertia $VPS_NAME statusTo manually deploy your project, you must first grant Inertia permission to clone your repository. This can be done by adding the GitHub Deploy Key that is displayed in the output of inertia $VPS_NAME init to your repository settings:
GitHub Deploy Key (add here https://www.github.com/<your_repo>/settings/keys/new):
ssh-rsa <...>
Once this is done, you can use Inertia to bring your project online on your remote VPS:
$> inertia $VPS_NAME upRun inertia $VPS_NAME --help to see the other commands Inertia offers for managing your deployment.
Inertia also offers a web application - this can be accessed at https://$ADDRESS:4303/web once users have been added through the inertia $VPS_NAME user commands.
To enable continuous deployment, you need the webhook URL that is printed during inertia $VPS_NAME init:
GitHub WebHook URL (add here https://www.github.com/<your_repo>/settings/hooks/new):
http://myhost.com:4303/webhook
Github WebHook Secret: inertia
The daemon will accept POST requests from GitHub at the URL provided. Add this webhook URL in your GitHub settings area (at the URL provided) so that the daemon will receive updates from GitHub when your repository is updated. Once this is done, the daemon will automatically build and deploy any changes that are made to the deployed branch.
The version of Inertia you are using can be seen in Inertia's .inertia.toml configuration file, or by running inertia --version. The version in .inertia.toml is used to determine what version of the Inertia daemon to use when you run inertia $VPS_NAME init.
You can manually change the daemon version used by editing the Inertia configuration file. If you are building from source, you can also check out the desired version and run make inertia-tagged or make RELEASE=$STREAM. Inertia daemon releases are tagged as follows:
v0.x.xdenotes official, tagged releases - these are recommended.latestdenotes the newest builds onmaster.canarydenotes experimental builds used for testing and development - do not use this.
The daemon component of an Inertia release can be patched separately from the CLI component - see our wiki for more details.
Add some bling to your Inertia-deployed project 😎
[](https://github.com/ubclaunchpad/inertia)
UBC Launch Pad is a student-run software engineering club at the University of British Columbia that aims to provide students with a community where they can work together to build a all sorts of cool projects, ranging from mobile apps and web services to cryptocurrencies and machine learning applications.
Many of our projects rely on hosting providers for deployment. Unfortunately we frequently change hosting providers based on available funding and sponsorship, meaning our projects often need to be redeployed. On top of that, deployment itself can already be a frustrating task, especially for students with little to no experience setting up applications on remote hosts. Inertia is a project we started to address these problems, with the goal of developing an in-house deployment system that can make setting up continuously deployed applications simple and painless, regardless of the hosting provider.
The primary design goals of Inertia are to:
- minimize setup time for new projects
- maximimise compatibility across different client and VPS platforms
- offer an easy-to-learn interface for managing deployed applications
There is a detailed Medium post that goes over the project, its motivations, the design choices we made, and Inertia's implementation. The team has also made a few presentations about Inertia that go over its design in some more detail:
In summary, Inertia consists of two major components: a deployment daemon and a command line interface.
The deployment daemon runs persistently in the background on the server, receiving webhook events from GitHub whenever new commits are pushed. The CLI provides an interface to adjust settings and manage the deployment - this is done through HTTPS requests to the daemon, authenticated using JSON web tokens generated by the daemon. Remote configuration is stored locally in .inertia.toml.
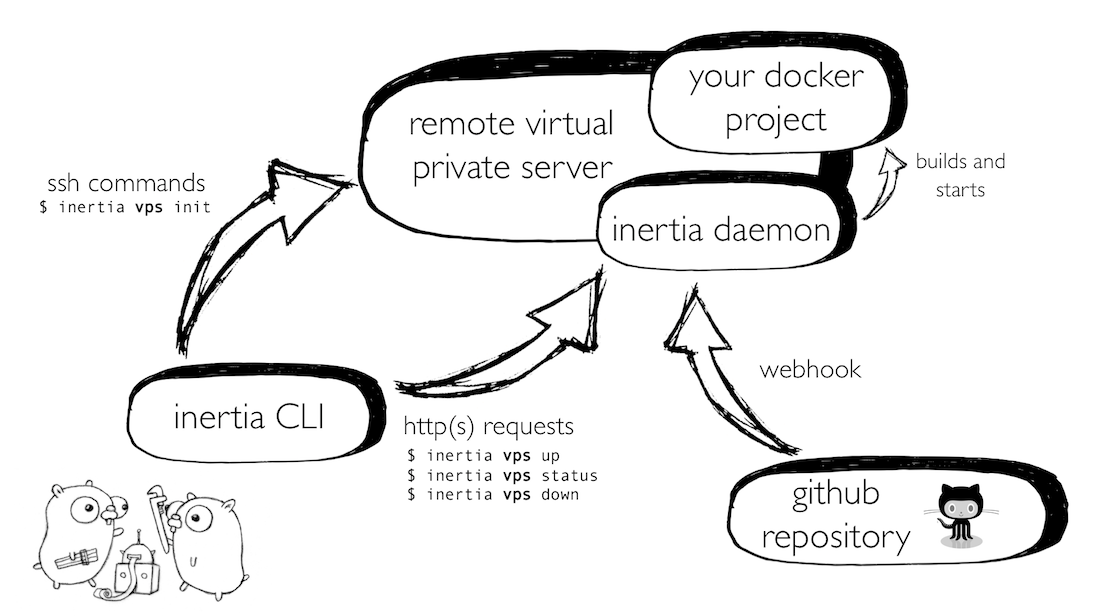
Inertia is set up serverside by executing a script over SSH that installs Docker and starts an Inertia daemon image with access to the host Docker socket. This Docker-in-Docker configuration gives the daemon the ability to start up other containers alongside it, rather than within it, as required. Once the daemon is set up, we avoid using further SSH commands and execute Docker commands through Docker's Golang API. Instead of installing the docker-compose toolset, we use a docker-compose image to build and deploy user projects.
Any contribution (pull requests, feedback, bug reports, ideas, etc.) is welcome!
Please see our contribution guide for contribution guidelines as well as a detailed guide to help you get started with Inertia's codebase.


