Face detection uses classifiers, which are algorithms that detects what is either a face(1) or not a face(0) in an image. Here we work with face detection using Haar-Cascade classifier with OpenCV. OpenCV comes with many pre-trained models of haarcascade classifiers like face, eye, smile etc in XML file. Those XML files (pre-trained models) are stored in opencv/data/haarcascades/ folder. You can also add those classifiers if you want, but here I am going to use only two classifiers i.e. one for face and another for eye.
In this project, we are going to use default camera of our system/laptop to take input as live video OR you can also pass a video as an argument to perform face detection on video. As we can't directly work on video, we will be extracting each frames from the video and then perform face detection on frames.
Python with OpenCV installed.
To install opencv
pip install opencv-python
- clone this repo using
git clone https://github.com/Sonkaryasshu/Face_Detection.git
cd Face_Detection
- Run python file, specifying input source
If input is any video, pass that video as an argument
python detector.py "input_video.mp4"
Else input will be taken from default camera of your system
python detector.py
- To quit the program Press 'q' from keyboard
OpenCV provides us with two pre-trained and ready to be used for face detection classifiers:
Haar Classifier
LBP Classifier
Both of these classifiers process images in gray scales, basically because we don't need color information to decide if a picture has a face or not.
The Haar Classifier is a machine learning based approach, an algorithm created by Paul Viola and Michael Jones; which are trained from many many positive images (with faces) and negatives images (without faces). It starts by extracting Haar features from each image as shown by the windows below:
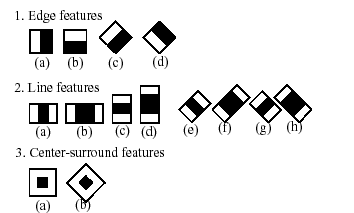
A couple Haar-like features.
Each window is placed on the picture to calculate a single feature. This feature is a single value obtained by subtracting the sum of pixels under the white part of the window from the sum of the pixels under the black part of the window.
Now, all possible sizes of each window are placed on all possible locations of each image to calculate plenty of features.

Different stages in visualization.
For example, in above image, we are extracting two features. The first one focuses on the property that the region of the eyes is often darker than the area of the nose and cheeks. The second feature relies on the property that the eyes are darker than the bridge of the nose.
But among all these features calculated, most of them are irrelevant. For example, when used on the cheek, the windows become irrelevant because none of these areas are darker or lighter than other regions on the cheeks, all sectors here are the same.
So we promptly discard irrelevant features and keep only those relevant with a fancy technique called Adaboost. AdaBoost is a training process for face detection, which selects only those features known to improve the classification (face/non-face) accuracy of our classifier.
In the end, the algorithm considers the fact that generally: most of the region in an image is a non-face region. Considering this, it’s a better idea to have a simple method to check if a window is a non-face region, and if it's not, discard it right away and don’t process it again. So we can focus mostly on the area where a face is.
- High detection accuracy
- Low false positive rate
- Slow
- Longer training time
- Less accurate on black faces
- Limitations in difficult lightening condition